The computer, in addition to consist of a series of hardware, also containing an array of interconnected software and mutually support one another. If the hardware is scanned with a sense of the human eye, in contrast to the software should be scanned with the software anyway.
Check Disk is a feature in Windows 8.1 that can be used to scan and repair any damage to the PC disk. Given how important the data on your hard disk, you must know how to use Disk Check in Windows 8.1.
2. Click 'Properties' at the bottom of the last option. Then, scroll to the 'Tools'.
3. Look at the 'Error checking.' You can see a button 'Check.' Click on the button to start the Check Disk feature.
4. A pop up window will come out if your PC has not asked for a disk scanning procedure. Please note that you must turn off all programs running Check Disk before starting this procedure. Do not forget to make a back-up important data if it does not want to happen.
5. Always remember that the Check Disk is necessary for the health of your drive. For that, do it regularly. It should be added also to not disrupt the work process Check Disk. The procedure will run when you click the 'Scan the drive'.
6. An another pop up window will appear, showing the time required to complete the scan.
7. When the scanning process is complete, you will see a window pop up like the one below.
The window showed no abnormality on your drive. If anything, this feature will show an error occurs anywhere. You can click 'Show Details' to report more clearly.
Check Disk is a feature in Windows 8.1 that can be used to scan and repair any damage to the PC disk. Given how important the data on your hard disk, you must know how to use Disk Check in Windows 8.1.
How to Run Check Disk feature in Windows 8.1
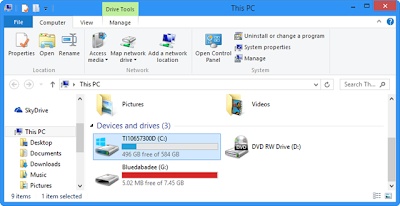
1. First, go to "File Explorer." In the disk drive you want to scan, right click. Disk drives can be either a hard disk or partition with the USB and the other following. Exit option looks like this.2. Click 'Properties' at the bottom of the last option. Then, scroll to the 'Tools'.
3. Look at the 'Error checking.' You can see a button 'Check.' Click on the button to start the Check Disk feature.
4. A pop up window will come out if your PC has not asked for a disk scanning procedure. Please note that you must turn off all programs running Check Disk before starting this procedure. Do not forget to make a back-up important data if it does not want to happen.
5. Always remember that the Check Disk is necessary for the health of your drive. For that, do it regularly. It should be added also to not disrupt the work process Check Disk. The procedure will run when you click the 'Scan the drive'.
6. An another pop up window will appear, showing the time required to complete the scan.
7. When the scanning process is complete, you will see a window pop up like the one below.
The window showed no abnormality on your drive. If anything, this feature will show an error occurs anywhere. You can click 'Show Details' to report more clearly.


