Setting Computers: Mac

Cari Artikel Gratis di sini

Showing posts with label Mac. Show all posts
How to Change the Default Application For Extension Files On Mac
How to Change the Default Application For Extension Files On Mac - In some cases we need to change which application is used for a particular file extension. If you find a movie player, text editor or image viewer better, you might want to use the app for all files with the same file extension. For example, QuickTime Player is the default application to view MP4 movie files on OS X, but VLC media player can be a choice.

Follow the steps below to change your default preferences:

1. Locate the file with the extension you want to change the default.
2. Right-click on the file to see the menu, and select "Get Info". (right-click is a click with two fingers on the trackpad in the Finder).
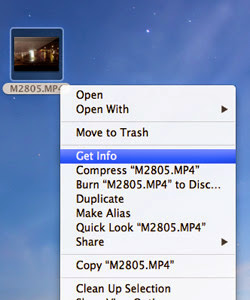
How to Change the Default Application For Extension Files On Mac

3. A window will appear with the file information, see the section called "Open with"

spotlight-open-with.jpg
Choose Spotlight > Open With
4. It will show the current application that is used to open the file, use the dropdown box to select a new application to open it. If you do not see the new application in the dropdown box, select the "Other" to find the application.

VLC-open-with.jpg
Open With VLC
5. Click on the "Change All" to apply the changes to all files that end with the same file extension. That's it.

change-all.jpg
Change All
Note further:

You can always override the default by manually opening files in different apps with right click, and select "Open With" if the default application to open inappropriately.

To make it easier to distinguish between the file extension, you might want to also make all file extensions visible. In the Finder, select Preferences on the top menu, and click on the Advanced tab. Check the box labeled "Show all filename extensions".

Read our other article How to Make Internet Connection Sharing on a Mac
How to Share Internet Connection On Mac
How to Share Internet Connection On Mac - Mac OS X has a built-in function that Internet Sharing can be a lifesaver when you are traveling. If you are in a hotel room with an ethernet cable, you can create a wireless hotspot to share the Internet connection with other computers. On the other hand, if you only have wireless access / Wi-Fi, only possible to share internet connection using a LAN cable. Read on this article to find out how to share internet connection on Mac.

How to Share Internet Connection On Mac

It has two parts:

1. Share your Wi-Fi connection via Ethernet
2. Share a wired Ethernet connection wirelessly (Make a hotspot)

Sharing Wireless Connection via Ethernet

My MacBook Pro is connected to the Internet via Wi-Fi, and I want other computers are Windows computer to get online. You can only connect the internet via an ethernet cable/LAN. What can be done?

1. Connect the Ethernet cable connected to a Mac Wi-Fi, and a Windows PC to which you want to get Internet access. Do not need a crossover cable or other network hardware required.
2. Open the System Preferences. Can usually be found in your dock, if no, search in your Applications folder.
3. In System Preferences, under Internet & Wireless, go to the Sharing menu.
4. In the Sharing menu, select Internet Sharing from the list on the left. You will see the Internet Sharing option.

How to Share Internet Connection On Mac

5. Select to share your connection from Wi-Fi to a computer via Ethernet.
6. Finally, click on Internet Sharing check box to activate the service.
7. Your Windows PC should now get an internet connection. If not, try restarting the computer.


That's it. Have fun!

Sharing Wireless Connection Through Ethernet Cable (create a hotspot)

For example, I am currently in a hotel that does not have Wi-Fi, but no Ethernet jack in the wall. While I have some wireless devices (iPad, iPhone, other computers, etc.) that require internet access. What can be done?

Say your Macbook is no LAN port and plug that computer into a wireless hotspot your Mac. However, if you have any of the MacBook Air or MacBook Pro Retina is no LAN port, unfortunately you need an adapter / converter from USB or Thunderbolt to Ethernet.

1. Connect your Mac to the network with Ethernet. Check and make sure your Mac is connected to the internet.
2. Open System Preferences, under Internet & Wireless, search Sharing menu.
3. From the list on the left, click on Internet Sharing, and you will see the Internet Sharing option.
4. Choose to share your connection from Ethernet to Wi-Fi.


5. Click on the Wi-Fi Options button to configure the name and password of your wireless network. The name is up to you, let the choice of such a channel. And set the password for the wireless network you created.


6. Finally, do not forget to check that Internet Sharing is checked to enable sharing.


7. Now your Mac to act as a wireless router, providing a Wi-Fi for all your gadgets.
8. Connect your wireless device to your new hotspot.

This guide was written on Mac OS X 10.9.3 Mavericks, there may be differences in previous versions. The steps are a little different.

Read our other article How to Know the Wi-Fi password on Mac.
How to Display WiFi Password Stored In Keychain On OS X Mavericks
How to Display WiFi Password Stored In Keychain On OS X Mavericks - Here are the steps to display the password one of your Wi-Fi.

1. Open the Keychain Access application. Can pass the /Applications/Utilities/KeychainAccess.app, or press Command + spacebar to open Spotlight search, then type in "Keychain Access" and press Enter.

How to Display WiFi Password Stored In Keychain On OS X Mavericks

2. In the upper right corner, find the name of your Wi-Fi network. This search will find your network password entry stored in the Keychain.


3. Double-click on your network name from the list of results.


4. Tick the "Show password" and enter your admin username and password of your Mac, and then click the OK button.


And as a result, your network password will appear.


Good luck and hopefully useful! Check our other article on how to check internet speed on Mac.
How to Format External Hard Drive Compatible With Mac and Windows Without Third Party Software
How to Format External Hard Drive Compatible With Mac and Windows Without Third Party Software - The external hard drive can quickly move large files between computers. If the external hard drive you want to run smoothly both on Mac and on Windows, you must use a filesystem that is supported by both platforms. The problem is by default Windows uses nfts, and Mac using HFS. Windows can not read or write HFS drives, and the Mac can not write to NTFS drives but can only read it.

Mac and Windows having different file systems. To be able to use an external hard disk (read write delete) for Mac and Windows, will need to select the "MS DOS File System" for the format of your hard disk.

There are third party solutions that free and paid so that the Mac can work with NTFS, and Windows understand HFS. But it costs money, slow / bug, or you may not have permission to install software on the computer. Below article will explain how you can use FAT or exFAT filesystem to make your external hard drive is compatible with both Mac and Windows for free.

Warning: The following guide includes re-formatting the external hard drive, it will erase all the data on your external hard drive. Do not forget to make a backup copy of your files in order not to lose.

How to Format External Hard Drive Compatible With Mac and Windows Without Third Party Software

Option 1: FAT
Pros: Works natively with all Macs and all Windows.
Disadvantages: Can not handle files larger than 4GB if 1x transfer.

How to Format using FAT

1. Open Disk Utility on your Mac. (faster using Spotlight, click on the magnifying glass and type in Disk Utility).

Mac Spotlight Disk Utility - How to Format External Hard Drive Compatible With Mac and Windows Without Third Party Software

2. Select the drive you want to format.

Mac Drive - How to Format External Hard Drive Compatible With Mac

3. Select the "Erase" tab in Disk Utility.

Mac Erase Disk Utility - How to Format External Hard Drive Compatible With Mac

4. Select MS-DOS (FAT) from the drop down box.

Mac MS DOS FAT - How to Format External Hard Drive Compatible With Mac

5. Click Erase and follow the prompts.
6. Allow the process is complete.

Option 2: exFAT
Pros: Can work with large files.
Disadvantages: Not compatible with older operating systems / old. You have to use the Mac OS X 10.6.5 or later, and Windows must be Windows Vista SP1, Windows 7, or later.

How to use exFAT format (on Windows)

1. Connect the hard drive to a Windows Vista SP1 or Windows 7.
2. Open the Computer window.

Windows Explorer - How to Format External Hard Drive Compatible With indows

3. Right-click on your external hard drive, and select Format.

Windows Format - How to Format External Hard Drive Compatible With indows

4. Select the exFAT from the drop down box, and click Start.

Windows ExFat Format - How to Format External Hard Drive Compatible With indows

5. Done! Now the external hard drive you can work on Mac and Windows.

Although FAT is more compatible with the old system, can not transfer files over 4GB that's shortcomings. You will not be able to use this hard drive if using FAT for file transfer HD video long duration and image files / ISO large, for example. For this reason I would recommend exFAT.
How to Take a Screenshot on a Mac
How to Take a Screenshot on a Mac - Apple minimalist design means that the keyboard has keys that you need, everything else is done by means of a keyboard shortcut. No special printscreen button as you get on the PC, so you need to use the keyboard shprtcut way.

To take a screenshot of the full screen resolution of the entire screen, hold down the Command and Shift keys simultaneously and do not release then press the number 3. To take a screenshot of a specific part of the screen, the same way, press the Command and Shift keys simultaneously and press 4.

Take Screenshot Mac - How to Take a Screenshot on a Mac

The result is a PNG image file on your desktop, and file names based on the date and time of capture screenshots.

Bonus: The PNG format is pretty good for screenshots, since it provides a good balance between file size and sharpness of the image, but if you choose JPEG instead, you need to enter the following two commands into the terminal (one by one).

default write com.apple.screencapture type jpg

killall SystemUIServer

The first line change the screenshot file format, and the second line to restart the process that used to take pictures. The default is PNG, but you can choose GIF, JPG, TIFF, and even PDF. Read our other article How to Record Screen on Mac With Free.
How to Record Screen on Mac With Free
How to Record Screen on Mac With Free - Do you want to show what you do on your Mac to someone? Or a lot of people? Sometimes video is the best medium to describe what you do. You can record and share it on YouTube or social networking. Here are tips on how to record the screen Mac using Quicktime Player 10 software built from the Mac OS X version 10.6 (Snow Leopard).

1. Open Quicktime Player, located in the Applications folder. You may not see the Quicktime window, but you will see a menu bar at the top of the Quicktime Player.

How to Record Screen on Mac With Free

2. Click on File -> New Screen Recording Now you will see a screen recording window.

Mac Sreen Recorder - How to Record Screen on Mac With Free

3. Click on the down arrow is white to match the desired settings. You can select the audio source, either your default microphone or audio input in-line. Here you can also select the video recording quality, a higher quality will produce larger files. The slider below the red record button to adjust the sensitivity of the microphone/input.

Set Screen Recording - How to Record Screen on Mac With Free

4. Click the red record button. Now you have the option to record your full screen (the default), or you can click to drag a selected area of ​​your screen to in-crop. Areas that are not recorded will be darker. Recording a larger area will result in larger files.

Screen Capture Crop - How to Record Screen on Mac With Free

5. Once you have chosen the area, click to continue. Now record your screen starts.

Share To Youtube - How to Record Screen on Mac With Free

6. When finished, click the stop button, and videos that you record will now appear, and you can see it.

7. Use the Share button (File menu -> Share) to quickly upload videos to YouTube, Facebook, Vimeo and others. Or click on the menu File -> Export to create a video file, to send / share your video manually.
How to Check Ethernet Connection Speed ​​in Mac
How to Check Ethernet Connection Speed ​​in Mac - Leisure fantastic wireless network is a sure thing you desire, but not comparable to the solidity and reliability of a wired network connection.

From where you can find out if your ethernet connection running at 10, 100 or 1000 Mbit/s? This article will tell you where I check the connection speed on Mac.

How to Check Ethernet Connection Speed ​​in Mac

1. Make sure your ethernet cable is plugged in and to make sure that you are connected to the network, open System Preferences> Network.

2. Next, open the Network Utility on your Mac. It is located in the Applications> Utilities> Network Utility. Or, find Network Utility in Spotlight Search.

Mac Spotlight Network - How to Check Ethernet Connection Speed ​​in Mac

3. On the Info tab, under Network Interface, use the drop-down menu to select Ethernet.

4. Then you will see the details of network connections including network address and connection speed.

Mac Network Utility - How to Check Ethernet Connection Speed ​​in Mac

Done! Now that you know how to determine the speed of your ethernet connection. You are currently still in the Network Utility? You can check out the other useful features of the Network Utility in other tabs, as shown below.
  • Ping: Allows you to test how long it takes to send messages to the remote server and receive a response. Size in milliseconds.
  • Whois: Find out who the owner of the registered domain name.
  • Traceroute: Navigate your request physical path along the Internet when you connect to the remote server.
3 Ways to Find the Serial Number on Mac Computers
As a Mac user, you must know the serial numbers of computer you have. Computer's serial number is required for various purposes such warranty claim or get a special offer from Apple.

There are several ways that you can do to find the serial number of Mac computers, if one day you have forgotten or lost records from an authorized reseller. Here is how to find the serial number 3 Mac computer that you can try, do not need to do all, just select the one that you find most convenient.

3 Ways to Find the Serial Number on Mac Computers

Through the About This Mac panel

1. One way you can do is access the About This Mac panel available on your computer, how. Click the Apple menu and click About This Mac.


3 Ways to Find the Serial Number on Mac Computers

2. Then click the OS X version of the label in the window that appears, then click once again to find your computer's serial number.


Through the System Information Utility

1. The second way you can do is to access the menu panel in System Information Utility. I click the Apple menu and then click Applications - Utilities - folder or Go - Utilities.


2. Then press Command + I.


Through Computer Hardware

1. The final way that also could be an option but it is the most convenient way is to look at the serial number on the bottom of the device. Try turning your Mac laptop and find the serial number as shown in this picture.


3 how to find the serial number above, could be a solution if one day you need it. You can also do a now and record it on a piece of paper or save them to the phone.
How to Disable the Dashboard in Mac OS X
How to Disable the Dashboard in Mac OS X - Dashboard feature was first introduced by Apple in version 10.4, in which there are a number of widgets for example calendar, weather and tracker that allows users to set the device applications.

Although it is provided to make it easier, but the dashboard feature was not liked by many Mac users so much effort was made to disable the dashboard.

If you're one of them, here's how to disable dashboard in Mac OS X that you can try.

How to Disable the Dashboard in Mac OS X


1. First, click System Preferences -> Mission Control, and then uncheck the option "Show Dashboard as a Space".


2. The above step is unfortunately not disable dashboard in full, but enough to reduce the intensity of the interference and you can still use this feature if desired.

3. To disable dashboard in full, perform the following steps. Open a terminal and copy and paste the following command code.

defaults write com.apple.dashboard mcx-disabled -boolean YES && killall Dock


4. To re-activate the dashboard, copy the following code to the terminal command.

defaults write com.apple.dashboard mcx-disabled -boolean NO && killall Dock

That was a way to disable the dashboard in Mac OS X, good luck and hopefully useful.

Read previous topic : How to Get the Latest Intel Graphics Driver Update in Linux
How to Change the iPhone Become Remote Computer Mac
How to Change the iPhone Become Remote Computer Mac - If you frequently perform at a seminar, or perhaps you are following a training program that requires you to engage in activities of daily presentations, you must also be doing a lot of powerpoint documents to be displayed.

Here I am not going to give any advice or tips on making presentations, or how successful presentation, as I'm sure you know more than me.

But on this occasion I will try to give a little help, which is related to the computer controlling the process to facilitate the presentation without having to buy additional devices. Because enough with the iPhone you can control the computer, simply moving the sample slides for the slide presentation.

To do that you need the help of an application called Hippo Remote Lite, which you can install onto your iPhone for free. Okay, now we try to practice.

How to Change the iPhone Become Remote Computer Mac


1. First, download the application from here: https://hipporemote.com/lite
2. Install the application to your iPhone.


3. Then open your Mac and open the System Preferences menu - Screen Sharing - Sharing.


4. Put a check in the Screen Sharing option and then enter the address of the VNC.


5. To prevent the other devices, use a security password that you can set as you like.


6. The computer will usually ask for authorization in the form of a user name and password before proceeding to the next process.


Up here, in fact you step done, now run the Hippo Remote Lite app on your iPhone and the device will automatically find each other.

This application can be used to be a remote for computers running Mac, Windows and Linux. It's easy and good luck.

Read previous topic : How to Protect Your Videos With Password
How to Automatic Login in Mac OS X
How to Automatic Login in Mac OS X - Basically on Mac and other operating systems as well, when you create multiple user accounts then when I had a good re-entry of sleep mode or hibernate, you must type the password first.

But in Max OS X platform, if you are lazy to do the same thing every going to get in, while the computer is used more often by you by yourself then you can set the device to a Mac go to your account automatically without having to type the password manually.

You must be wondering, is not it? Well, here's a guide that you can try.

How Automatic Login in Mac OS X


1. Turn on your laptop and open the System Preferences menu.


2. Click the Users & Group.


3. Click the padlock icon in the bottom left corner.


4. Enter your password if prompted.


5. Click the Login Options, then on the panel Automatic Login, select the user you want to use to log into the system automatically.


Now every time you come back from sleep mode or start the operation, the system will automatically enter the user password that you selected earlier.

Even so the system still will ask for confirmation password for access types such as the use of data networks, SSH and terminal services.

Read previous topic : How to Make Custom Installation ISO Files in Windows 8 and 8.1
How to Run Windows Applications on a Mac Computer
How to Run Windows Applications on a Mac Computer - If you are a Mac user who wants or needs a program that can only run on a Windows platform, then there are several options you can do. First Windows computer you can borrow a friend, or daring to change the computer.

Secondly you can use third party applications to help run Windows applications on a Mac computer. Is it possible? very likely, the choice could be the Bootcamp application, for Linux users can use Wine and the good news is now Wine can also run on a Mac computer.

In this article we will discuss how to run Windows applications on a Mac using Wineskin application assistance.

How to Run Windows Applications on a Mac Computer


1. Opening move first download the file from this page: https://wineskin.urgesoftware.com/tiki-index.php
2. Extract the file and insert it into your applications folder then run it, click the plus sign (+) to display the engine, this engine is required to run Windows applications.


3. Then click Download and Install.


4. The process begins to install it by clicking on the Create New Blank Wrapper, enter the name Wrappers, and click OK.


5. Then click the Install button.

6. After the wrapper successfully created, right-click and click Show Package Contents.


7. Next you will see two folders, open Wineskin App and run the Wineskin application.

8. Then click the Choose Setup Executable.


9. So now the installation process is the procedure resembles the one in Windows.


10. If you want to run the application, right-click on the file wrapper, click Advanced and then find that there is an application by clicking the Run Test.


11. Like this display Windows applications that run on Mac computers.


That's the way to run Windows programs on a Mac computer, a little complicated but only slowly, understand the process and it would be easy.

Read previous topic : How To Delete A Pre-installed Windows 8